Tonight is a
supermoon. If you want to try to capture it with your camera, here is a reprint of an article that I wrote for the
Mortal Muses.

Ah, the moon. Mankind has been endlessly fascinated with it. Photographers always want to capture it. It can be a frustrating process. What we see, often isn’t what we capture. Normal rules of getting a good exposure just don’t apply. It can be difficult to get an accurate meter reading when you are metering on a very bright object in a very dark sky. I finally gave up metering and just started experimenting. Your equipment, your location, your sky conditions will all play into getting a good shot.

Here are a few tips to help make that process a little easier:
1. Make sure your flash is off. If you don’t know how to turn it off, check your manual.
2. Use a tripod. Your exposures are apt to be long ones and you won’t be able to handhold your camera without some camera shake. If you don’t have a tripod, use any flat, steady surface, like the top of your car or the top of a wall. Don’t forget that long exposures can drain batteries more quickly so make sure your battery is fully charged or you have a back up.
3. If you have a filter on your lens, take it off. A filter may cause a ghosting effect.
4. Use the longest focal length you have. In most cases, the bigger you can make the moon look, the better. These shots were taken with focal lengths of 150mm (shots that included more scenery) to 400mm.
5. If you are comfortable shooting in manual, do so. The higher the f/stop, the sharper your photo will be.
6. Use manual focus, if needed (there is a switch on the side of your lens to turn the auto focus off). Some lenses really have to hunt in low light and may not be able grab a good focus. Since the moon is so far away, you will be able to set your lens on infinity and get a sharp focus.
7. Bracket your exposures. It is possible to over or underexpose by more than two stops by shooting manually. I recommend starting with your meter reading and underexposing from there. I usually shoot at -1/2 stop intervals to ensure that I get exactly what I want.
8. Use the lowest ISO possible, especially if your camera has noise issues.
Remember that it doesn’t have to be in the middle of the night when you shoot the moon. It is often up early in the morning or before it is quite dark. During the blue hour (more info
here), the moon can look quite dramatic.
You can see the drama of the blue sky but the moon has little detail and looks small in the sky. Many (probably most) of the photos you see in magazines that have the huge moon in a cityscape are actually two photos put together either as a double exposure (using film) or in Photoshop (using digital). It is very difficult (and often impossible) to get a crisp edge and proper exposure on the moon while getting the proper exposure on a building. For me, I don’t like putting together photos like this. I’d rather get what I get. To show you a hastily put together example, here is the moon from my first photo with the picture above.

This shot was exposed for the scenery. It was taken near dusk. The moon is sharp but over exposed. A graduated neutral density filter (and lots of practice) can help with this problem. For more information go
here.

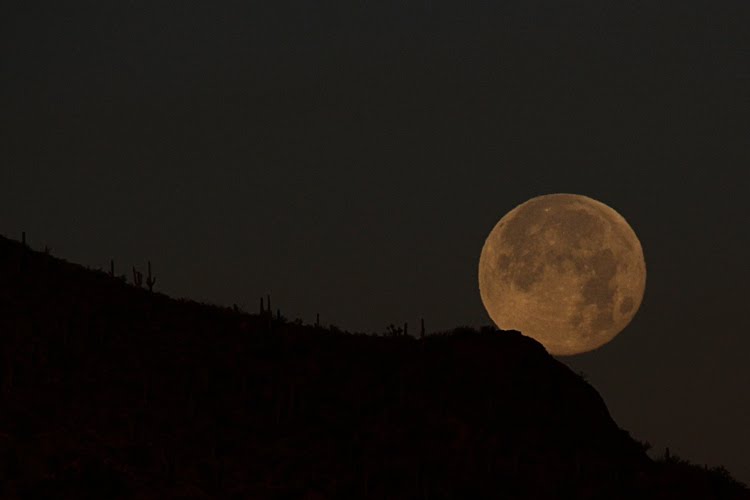
This was taken right before sunrise in January. The moon is in the western sky and the light just starting behind me in the east. The mountains and cactus are in silhouette. If I had exposed for the scenery, the moon would have been overexposed with no detail.

This was the view a bit later with a wider look, exposing more for the scenery than the moon.

This image was taken at night. The variety of the colors lit by the moon in the clouds drew my eye.

This shot was taken with the moon purposely over in the corner like this so I would have room for text. I have used this image for cards, changing the text to fit the recipient.

For more information of moonrise and set times, these sites are helpful:
http://www.usno.navy.mil/USNO/astronomical-applications/data-services/rs-one-year-us
http://stardate.org/nightsky/moon
Remember the key to shooting the moon is experimentation. Bracketing is key. Try different exposures. Most importantly, have fun!